What are Locators in Playwright?
In UI automation testing, the first step before interacting with a webpage element is identifying the element uniquely. This identification process is done using Playwright locators.
A locator tells Playwright which element on the page you want to interact with.
For example, when a test script clicks a login button, Playwright must first locate the button element.
Typical actions performed using locators include:
- Clicking buttons
- Entering text in input fields
- Selecting values in dropdowns
- Verifying text on the page
- Hovering over menus
- Drag and drop operations
Example:
await page.locator('#username').fill('admin');
In this example:
pagerepresents the current browser pagelocator('#username')identifies the elementfill()types text into the input field
Why Playwright Locators Are Better Than Traditional Selectors
Playwright introduced a modern locator system designed to make tests more reliable.
1. Auto Waiting
Playwright automatically waits for elements to be:
- present in the DOM
- visible
- stable
- enabled
This eliminates many flaky test failures.
Example:
await page.locator('#login').click();
Playwright will automatically wait until the login button is clickable.
2. Retry Mechanism
If an element is not immediately available, Playwright keeps retrying until timeout.
This helps when dealing with dynamic applications like React or Angular.
3. Readable Test Code
Locators like getByRole() and getByText() make tests easy to understand.
Example:
await page.getByRole('button', { name: 'Login' }).click();
Even non-technical stakeholders can understand this test.
Types of Playwright Locators
Playwright provides multiple locator strategies.
Each strategy has its own use case.
1. ID Locator
ID locators identify elements using the id attribute in HTML.
Example HTML:
<input id="username">
Playwright code:
await page.locator('#username').fill('admin');
Advantages
- Fast
- Unique
- Reliable
Best Practice
Always use id selectors when available because they are usually unique.
2. CSS Selectors
CSS selectors are widely used in UI automation.
Example:
await page.locator('.login-btn').click();
HTML:
<button class="login-btn">Login</button>
Attribute Based CSS
Example:
await page.locator('input[name="email"]').fill('test@gmail.com');
HTML:
<input name="email">
Parent Child CSS
await page.locator('.form-container button').click();
This finds a button inside .form-container.
3. XPath Locators
XPath is another way to identify elements.
Example:
await page.locator('//button[text()="Login"]').click();
When XPath is Useful
- Complex DOM structures
- No unique attributes available
- Navigating between parent and child elements
Disadvantages
- Slower than CSS
- Harder to maintain
- Can break easily if DOM structure changes
4. Text Locators
Playwright allows locating elements based on visible text.
Example:
await page.getByText('Login').click();
This finds an element that displays the text Login.
When to Use
- Buttons
- Links
- Menu items
5. Role Locators (Highly Recommended)
Playwright supports locating elements based on ARIA roles.
Example:
await page.getByRole('button', { name: 'Login' }).click();
Advantages
- Very stable
- Accessible testing
- Recommended by Playwright
Common roles:
- button
- textbox
- checkbox
- link
- heading
6. Placeholder Locator
Many input fields contain placeholder text.
Example HTML:
<input placeholder="Enter email">
Playwright:
await page.getByPlaceholder('Enter email').fill('test@gmail.com');
7. Label Locator
Forms often associate labels with input fields.
Example HTML:
<label>Password</label>
<input type="password">
Playwright:
await page.getByLabel('Password').fill('123456');
8. TestId Locator (Best Practice)
Modern applications often include test attributes specifically for automation.
Example HTML:
<button data-testid="login-button">Login</button>
Playwright code:
await page.getByTestId('login-button').click();
Why TestId Is Best
- Independent of UI changes
- Stable tests
- Recommended for automation frameworks
Locator Chaining in Playwright
1. What is Locator Chaining?
Locator Chaining in Playwright means finding a child element inside another element by linking locators together.
Instead of searching the entire page for an element, you first locate a parent element and then search within that parent for the required child element.
This helps make tests:
- More reliable
- More readable
- Less ambiguous
- Easier to maintain
Basic Idea
Instead of this:
page.locator('button')You narrow the search like this:
page.locator('#login-form').locator('button')Here:
#login-form→ parent locatorbutton→ child locator
Playwright will only search for the button inside the login form, not across the whole page.
2. Why Locator Chaining is Important
Modern web pages often contain multiple elements with the same selector.
For example if you navigate to the product page in demo site:
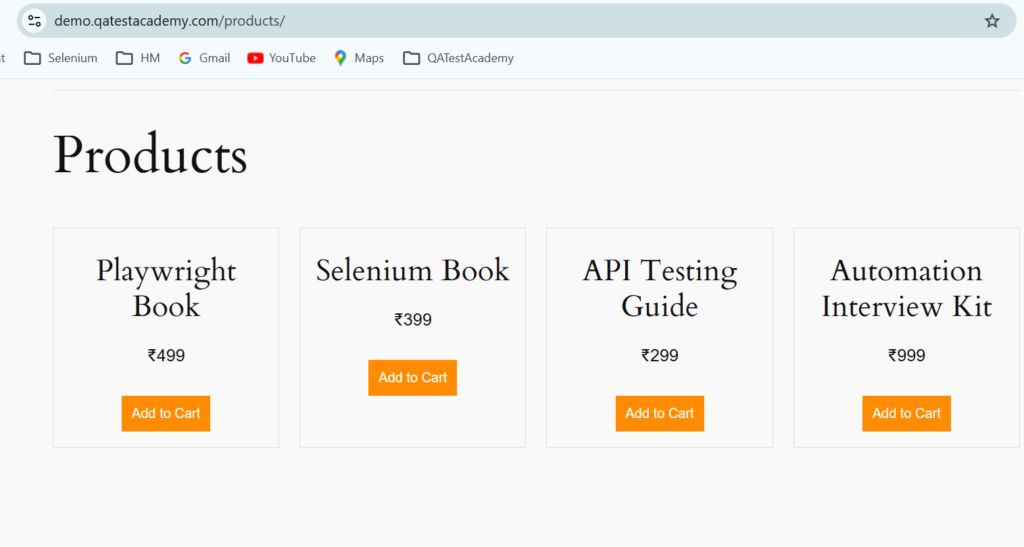
If you try to click on add to cart button for playwright book by writing:
page.locator('button:has-text("Add to Cart")')Playwright may find multiple buttons, which can cause:
- strict mode errors
- wrong element interactions
Locator chaining solves this problem by scoping the search.
Example:
await page
  .locator('.product')
  .filter({ hasText: 'Playwright Book' })
  .locator('button')
  .click();
Now Playwright only searches inside the product card.
3. Basic Syntax of Locator Chaining
Syntax
page.locator('parent_locator').locator('child_locator')
Example
await page
      .locator('#login-form')
      .locator('#username')
      .fill('admin');
Explanation:
- Find element with id
login-form - Inside it find
#username - Fill the textbox
4. Real World Example
HTML Structure
<div class="product">
   <h2>iPhone 15</h2>
   <button>Add to Cart</button>
</div>

<div class="product">
   <h2>Samsung S24</h2>
   <button>Add to Cart</button>
</div>
If you write:
await page.locator('button:has-text("Add to Cart")').click();Playwright will not know which product button to click.
Using Locator Chaining
await page
     .locator('.product', { hasText: 'iPhone 15' })
     .locator('button')
     .click();
Steps:
- Find product container containing text iPhone 15
- Inside that container locate button
- Click the button
Now the script interacts with the correct product.
5. Multiple Level Locator Chaining
Locator chaining can go multiple levels deep.
Example HTML
<div id="dashboard">
   <div class="card">
       <div class="card-body">
           <button>Submit</button>
       </div>
   </div>
</div>
Playwright Code
await page
     .locator('#dashboard')
     .locator('.card')
     .locator('.card-body')
     .locator('button')
     .click();
Flow:
dashboard
   ↓
card
   ↓
card-body
   ↓
button
Playwright searches step by step inside each parent.
6. Locator Chaining with getBy Locators
Locator chaining also works with Playwright’s recommended locators.
Example:
await page
     .getByRole('form')
     .getByLabel('Email')
     .fill('test@example.com');
Example 2:
await page
     .getByTestId('product-card')
     .getByRole('button', { name: 'Add to Cart' })
     .click();
This approach is more readable and stable.
7. Locator Chaining with Filters
Playwright allows filtering elements using has() and hasText().
Example
await page
     .locator('.product', { hasText: 'iPhone' })
     .locator('button')
     .click();
Or
await page
     .locator('.product')
     .filter({ hasText: 'iPhone' })
     .locator('button')
     .click();
Meaning:
- Find product containing text iPhone
- Inside that product click button
8. Locator Chaining vs Single Complex Selector
Without Chaining
page.locator('#login-form input[name="username"]')
With Chaining
page.locator('#login-form').locator('input[name="username"]')
Why chaining is better
| Without Chaining | With Chaining |
|---|---|
| Harder to read | Easy to understand |
| Large selectors | Structured approach |
| Harder to debug | Easy to debug |
| Fragile | More stable |
9. Locator Chaining in Page Object Model
Locator chaining works very well with Page Object Model (POM).
Example:
class ProductsPage {

  constructor(page){
      this.page = page;
      this.productCard = page.locator('.product-card');
  }

  async addProduct(productName){
      await this.productCard
           .filter({ hasText: productName })
           .locator('button')
           .click();
  }
}
Usage:
await productsPage.addProduct('iPhone 15');Benefits:
- Cleaner code
- Reusable locators
- Easy maintenance
10. Best Practices for Locator Chaining
a. Use meaningful parent locators
Good:
page.locator('.product-card').locator('button')Bad:
page.locator('div').locator('button')b. Avoid too many levels
Too deep chaining can make tests fragile.
Bad:
page.locator('#a').locator('#b').locator('#c').locator('#d')c. Prefer Playwright locators
Best approach:
page.getByTestId('product-card')
    .getByRole('button', { name: 'Add to Cart' })
Best Practices for Locators
Use this priority order:
1️⃣ getByRole
2️⃣ getByTestId
3️⃣ id
4️⃣ CSS selectors
5️⃣ XPath (last option)