Playwright framework folder structure is one of the most important aspects of building a scalable and maintainable Playwright automation framework. Playwright is a modern end-to-end testing framework that supports UI, API, and mobile testing. A well-designed folder structure makes your framework:
✅ Scalable
✅ Maintainable
✅ Easy to debug
✅ CI/CD friendly
Let’s understand the recommended enterprise-level Playwright framework structure.
Why folder structure matters
Playwright framework folder structure matters because it forms the backbone of a scalable and maintainable automation framework. It helps you:
✔ Write clean tests
✔ Reduce duplication
✔ Scale easily
✔ Debug faster
✔ Integrate smoothly with CI/CD
✔ Work efficiently in a team
A well-organized structure separates test cases, page objects, utilities, test data, and configuration files, making the code easy to understand and modify as the project grows. It helps reduce duplication by promoting reusable components like Page Object Models and common helpers, which improves overall code quality.
Real company structure
Refer to this guide for step-by-step instructions on setting up your Playwright project.
When you install Playwright using:
npm init playwright@latestYou get this structure:
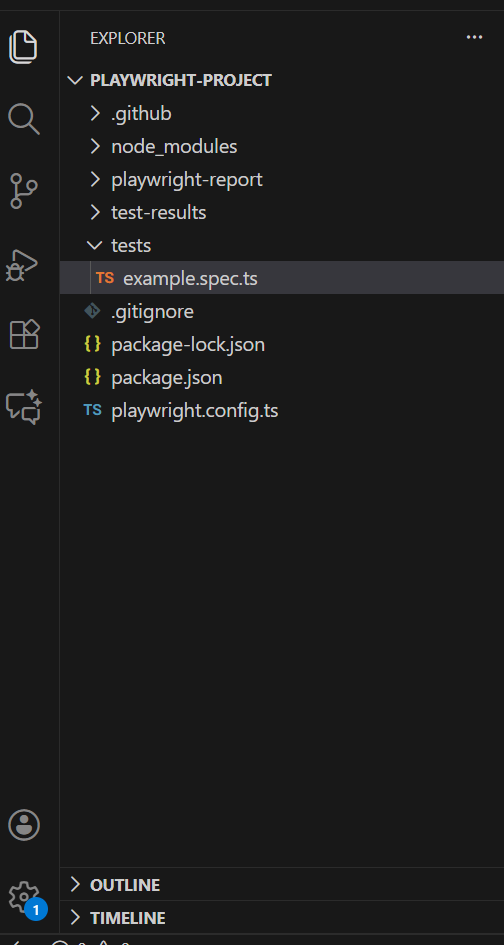
In real-world automation frameworks, the default project structure is not sufficient. A custom framework design is required to achieve scalability, reusability, and maintainability
Summary of what you need to add :
| Type | Name |
|---|---|
| Folder | pages |
| Folder | utils |
| Folder | fixtures |
| Folder | testdata |
| Folder | reports |
| Folder | screenshots |
| Folder | videos |
| File | .env |
| File | tsconfig.json |
| File | README.md |
You can create folders and files using the default options provided by your editor such as VS Code or IntelliJ (Add Folder or Add Files option).
Or you can also create folders using the mkdir command directly from the terminal.For that go to your directory where the playwright project is created and enter the command
mkdir pages
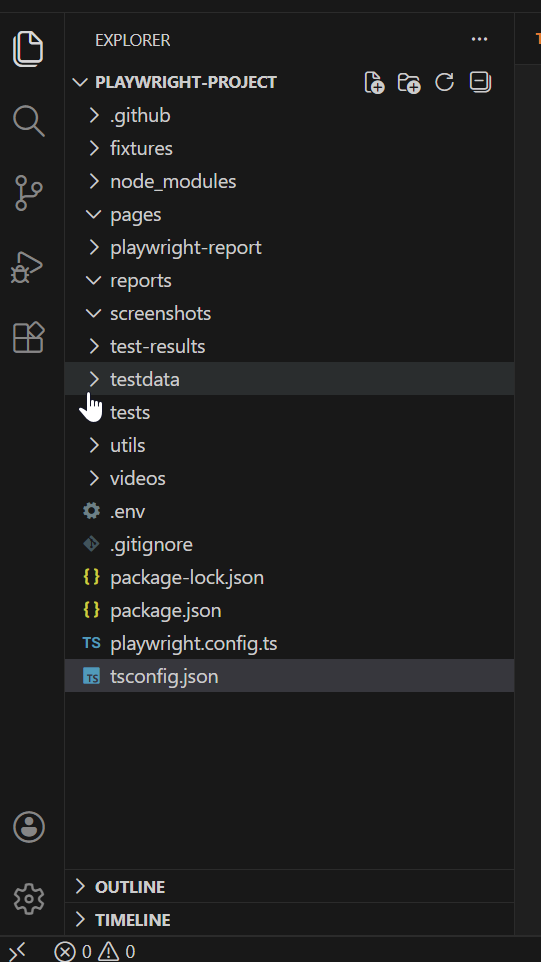
mkdir testdataOnce you add the required folders and files your framework will look like this :
Playwright Framework Folder Structure Explained
Let look at each folder and file in detail and learn about their purpose
A professional Playwright framework follows this layered design:
Test Layer       →  Test Scenarios
Page Layer       →  UI Actions & Locators
Utility Layer    →  Common reusable logic
Fixture Layer    →  Setup & session handling
Data Layer       →  External test data
Config Layer     →  Environment & execution control
Report Layer     →  Execution results
Each layer is mapped to a folder.
playwright-framework/
│
├── tests/              → Test scenarios
├── pages/              → Page Object Model
├── utils/              → Helper utilities
├── fixtures/           → Setup & teardown
├── testdata/           → External data
├── reports/            → Execution reports
├── screenshots/        → Failure screenshots
├── videos/             → Failure videos
│
├── .env                → Environment variables
├── tsconfig.json       → TypeScript config
├── playwright.config.ts→ Playwright config
├── package.json        → Dependencies
└── README.md           → Documentation
1️⃣ tests/ — Test Layer (Business Scenarios)
This is the topmost layer of the framework.
It contains only test scenarios, not technical logic.
Tests should be short, readable, and business-focused.
Lets start creating a basic Login test case. The scenario we are going to automate is :
- Navigate to url ‘https://demo.qatestacademy.com/’
- Verify title of the Home page
- Click on the Login link
- Enter username and password and click Login
- Verify user is logged in.
This tutorial uses the QATestAcademy Automation Demo Platform, a controlled practice site designed for real-world automation scenarios.
First we will create a new file inside tests folder ‘login.spec.ts’

Now add following code inside tsconfig.json file, we will explain this file in detail later but currently just copy and paste it to your tsconfig file otherwise playwright will throw an error while we run tests.
{
  "compilerOptions": {
    "target": "ES2020",
    "module": "commonjs",
    "strict": true,
    "esModuleInterop": true,
    "skipLibCheck": true,
    "outDir": "dist",
    "resolveJsonModule": true
  }
}
For now we will create the whole test case inside login.spec.ts file, but we will optimize it step by step seperating the page objects , env variables and tests into different files as we move ahead. This will give you an idea how to build a framework from scratch
login.spec.ts
import { test, expect } from '@playwright/test';

test('valid login', async ({ page }) => {

  //Navigate to the page
  await page.goto('https://demo.qatestacademy.com/');

  //Verify title of the page
  await expect(page).toHaveTitle(/QATestAcademy Automation/);

  //Click on the Login link
  await page.getByRole('link', {name : 'Login'}).click();

  //Enter username and password and click Login
  await page.getByRole('textbox', { name: 'Email' }).fill('testadmin@test.com');
  await page.getByRole('textbox', { name: 'Password' }).fill('Test@1234');
  await page.getByTestId('login-button').click();

  //Verify the page is navigated to products page after login
  await expect(page).toHaveURL(/products/);
});
Lets go through code line by line :
import { test, expect } from '@playwright/test';
imports Playwright’s built-in test runner utilities. The test function is used to define and execute test cases, while expect is used to perform assertions and validations. These utilities allow us to write readable, reliable, and maintainable automated tests without relying on any external testing libraries.
test('valid login', async ({ page }) => {
defines a test case named “valid login”. The test function receives a page object as a fixture, which represents a fresh browser page created automatically by Playwright. The async keyword is required because all Playwright browser interactions are asynchronous and must be awaited to ensure proper execution order.
await page.goto('https://demo.qatestacademy.com/');
navigates the browser to the specified application URL. Playwright automatically waits for the page to load before continuing execution, ensuring that subsequent actions are performed only after the page is ready.
await expect(page).toHaveTitle(/QATestAcademy Automation/);
This assertion uses a regex with toHaveTitle to verify partial page title. Playwright auto-waits for the title to update, making the check stable and non-flaky
await page.getByRole('link', {name : 'Login'}).click();
locates and clicks the Login link on the page. The getByRole locator identifies the element based on its accessibility role, which improves test reliability and aligns with modern accessibility standards. The name option specifies the visible text associated with the link.
await page.getByRole('textbox', { name: 'Email' }).fill('testadmin@test.com');enters the email address into the login email input field. The fill method clears any existing text and types the provided value into the field.
await page.getByRole('textbox', { name: 'Password' }).fill('Test@1234');locates the password input field using its placeholder text and fills in the password.
await page.getByTestId('login-button').click();clicks the login button . This action submits the login form. Playwright automatically waits for the element to be actionable before performing the click, ensuring stable execution.
await expect(page).toHaveURL(/products/);This statement verifies that the browser has successfully navigated to a URL containing /products after Login.
Playwright automatically waits for the navigation to complete, making the assertion reliable and preventing flaky test failures.
Now to run the code in the terminal use the npx playwright test command followed by the path to your specific test file.
npx playwright test tests/login.spec.tsThis will generate an output with number of testcases passed and a HTML report
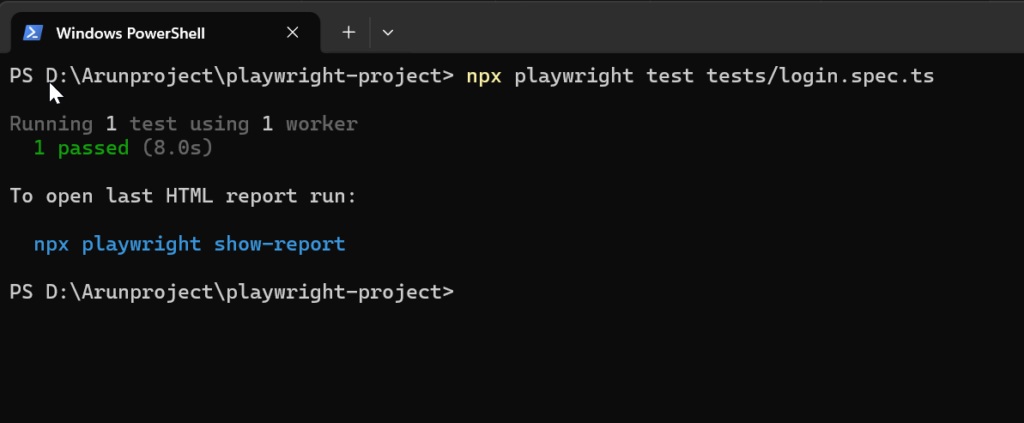
To see the report run npx playwright show-report .

Next module we will implement the Page Object Model to the existing framework seperating test cases with the page objects