Playwright CI/CD Pipeline setup using GitHub Actions is an essential skill for modern automation engineers. In this beginner-friendly tutorial, you’ll learn how to run Playwright tests automatically on every code change using GitHub Actions, step by step.
This guide explains everything in simple language, with real code examples, making it perfect for beginners and working professionals.
Why Playwright CI/CD Pipeline Is Important
Running Playwright tests only on a local machine is not enough in real projects. A Playwright CI/CD pipeline ensures that:
- Tests run automatically
- Bugs are detected early
- Code quality is maintained
- Manual effort is reduced
By integrating Playwright with GitHub Actions, you ensure your automation runs continuously without manual intervention.
What Is CI/CD?
- CI (Continuous Integration):
Automatically runs tests whenever code is pushed to GitHub. - CD (Continuous Delivery):
Ensures the application is always ready to be released.
👉 In simple words:
You push code → GitHub runs Playwright tests automatically
Why Use GitHub Actions for Playwright?
GitHub Actions is widely used because:
- It is built into GitHub
- No external tools are required
- Free for public repositories
- Easy YAML-based configuration
Playwright works very well with GitHub Actions because it supports headless browsers, parallel execution, and HTML reports.
Prerequisites Before Setting Up Playwright CI/CD
Before proceeding, make sure:
- Playwright is installed
- Tests run locally using:
npx playwright test - Code is pushed to a GitHub repository
Once you initialize github in your project your project will look like this :
Playwright Project Structure (Recommended)
playwright-project/
│── .github/
│── tests/
│── pages/
│── fixtures/
│── playwright.config.ts
│── package.json
│── .gitignore
GitHub Actions configuration will be added inside:
.github/workflows/Step 1: Create GitHub Actions Workflow File
Create the following file in your project root:
.github/workflows/playwright.yml
This file controls when and how Playwright tests run in CI.
Step 2: Playwright GitHub Actions YAML File
Add following code in paywright.yml file :
name: Playwright Tests

on:
  push:
    branches: [ main ]
  pull_request:
    branches: [ main ]

jobs:
  playwright-test:
    runs-on: ubuntu-latest

    steps:
      - name: Checkout code
        uses: actions/checkout@v4

      - name: Setup Node.js
        uses: actions/setup-node@v4
        with:
          node-version: 18

      - name: Install dependencies
        run: npm ci

      - name: Install Playwright browsers
        run: npx playwright install --with-deps

      - name: Run Playwright tests
        run: npx playwright test

      - name: Upload Playwright Report
        if: always()
        uses: actions/upload-artifact@v4
        with:
          name: playwright-report
          path: playwright-report
Explanation of GitHub Actions YAML
Workflow Name
name: Playwright TestsThis line defines the name of the workflow. It appears in the GitHub Actions tab and helps identify what this pipeline is responsible for. In this case, it clearly indicates that the workflow is dedicated to running Playwright automated tests.
Trigger Conditions
on:
  push:
    branches: [ main ]
  pull_request:
    branches: [ main ]
This section specifies when the workflow should run.
The workflow is triggered in two scenarios. First, it runs whenever code is pushed directly to the main branch. Second, it runs when a pull request is opened or updated targeting the main branch. This ensures that tests are executed both for direct commits and for code that is about to be merged, helping catch issues early.
Jobs
jobs:
  playwright-test:
A workflow can contain one or more jobs. Here, a single job named playwright-test is defined. This job encapsulates all the steps required to install dependencies, set up the environment, and run Playwright tests.
Runner
runs-on: ubuntu-latestGitHub creates a fresh Linux machine to run your Playwright tests.
Checkout Repository
- name: Checkout code
  uses: actions/checkout@v4
This step downloads the latest version of your repository code into the runner. Without this step, the workflow would not have access to your Playwright tests, configuration files, or package.json.
Setup Node.js
name: Setup Node.js
uses: actions/setup-node@v4
with:
  node-version: 18
Installs Node.js required for Playwright.
Install Dependencies
name: Install dependencies
run: npm ci
This step installs all project dependencies defined in package-lock.json. The npm ci command is optimized for CI environments because it is faster, produces reproducible builds, and fails if dependency versions don’t match the lock file.
Install Playwright Browsers
npx playwright install --with-depsInstalls Chromium, Firefox, WebKit, and system dependencies.
Run Playwright Tests
npx playwright testThis step runs the Playwright test suite using the configuration defined in playwright.config.ts. If any test fails, this step exits with a non-zero status, causing the workflow to fail.
Step 3: View CI Test Results in GitHub
After pushing code:
- Go to GitHub → Actions
- Click the workflow
- Open job logs
- View test execution details
Step 4: Upload Playwright HTML Report
By default, CI deletes reports after execution. We must upload them manually.
name: Upload Playwright Report
if: always()
uses: actions/upload-artifact@v4
with:
  name: playwright-report
  path: playwright-report
name: Upload Playwright Report
This line gives a human-readable name to the step.
if: always()
This condition ensures that the step runs no matter what happens in previous steps whether the Playwright tests pass, fail, or even crash. Without always(), GitHub Actions would skip this step if the test execution fails, and you would lose access to the test report.
uses: actions/upload-artifact@v4
This line tells GitHub Actions to use the official Upload Artifact action provided by GitHub. Artifacts are files generated during a workflow run that you want to store and download later, such as logs, screenshots, videos, or test reports.
with:
This section is used to pass configuration inputs to the upload-artifact action.
name: playwright-report
This defines the artifact name as it will appear in the GitHub Actions UI. When the workflow finishes, you’ll see a downloadable artifact called playwright-report, making it easy to identify which files belong to the Playwright test run.
path: playwright-report
This specifies the directory or file path that should be uploaded as an artifact. By default, Playwright generates its HTML report inside a folder named playwright-report. This line tells GitHub Actions to collect everything inside that folder and store it as a downloadable artifact.
Step 5: Configure Playwright HTML Reporter
In playwright.config.ts:
reporter: [['html', { open: 'never' }]],
This prevents browser pop-ups during CI runs.
Use Environment Variables in CI (Best Practice)
Environment variables allow you to separate configuration from code, making your Playwright framework secure, flexible, and CI-friendly. They are commonly used for URLs, credentials, API tokens, and environment-specific settings.
🔹 Why Environment Variables Are Important
Instead of hard-coding sensitive or environment-specific values:
- Base URLs
- Usernames & passwords
- API keys
- Feature flags
we store them as environment variables so the same test code works across local, QA, staging, and CI environments.
🔹 Step 1: Use .env File for Local Execution
Create a .env file at the root of your Playwright project:
BASE_URL=https://automationexercise.com
USERNAME=testuser@example.com
PASSWORD=Password123
👉 Do not commit this file. Add it to .gitignore.
.env🔹 Step 2: Install dotenv
Playwright does not load .env files automatically.
npm install dotenv --save-dev🔹 Step 3: Load Environment Variables in playwright.config.ts
import { defineConfig } from '@playwright/test';
import dotenv from 'dotenv';

dotenv.config();

export default defineConfig({
  use: {
    baseURL: process.env.BASE_URL,
    headless: true,
  },
});
This makes all variables in .env available through process.env.
🔹 Step 4: Use Environment Variables in Tests
test('Login test using env variables', async ({ page }) => {
  await page.goto('/');
  await page.fill('#email', process.env.USERNAME!);
  await page.fill('#password', process.env.PASSWORD!);
});
Using ! tells TypeScript that the variable will exist at runtime.
🔹 Step 5: Define Environment Variables in GitHub Actions
In CI, .env is not available, so values must be provided directly in the workflow.
Example: playwright.yml
- name: Run Playwright tests
  env:
    BASE_URL: https://automationexercise.com
    USERNAME: ${{ secrets.USERNAME }}
    PASSWORD: ${{ secrets.PASSWORD }}
  run: npx playwright test
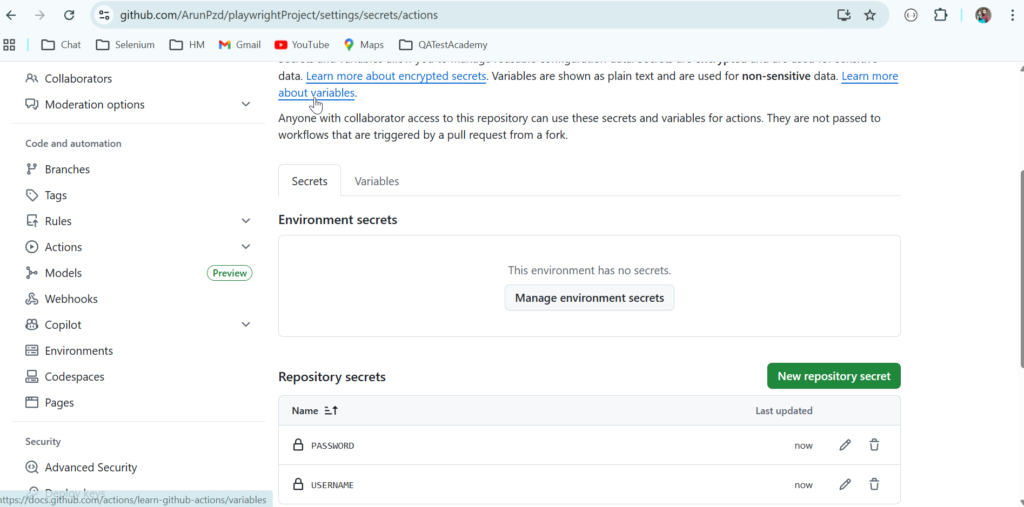
🔐 Step 6: Store Secrets in GitHub
- Go to GitHub Repository → Settings
- Open Secrets and variables → Actions
- Click New repository secret
- Add:
USERNAMEPASSWORD
These secrets are encrypted and never exposed in logs.
🔹 Common Mistakes to Avoid
❌ Committing .env files
❌ Hard-coding credentials in tests
❌ Logging process.env values
❌ Using secrets directly in code
🧠 Interview Tip
In Playwright, we manage environment-specific data using .env files locally and GitHub Secrets in CI, loaded via dotenv and accessed using process.env.
Common Playwright CI/CD Issues & Fixes
❌ Browser launch error → Use --with-deps
❌ Tests fail only in CI → Fix waits and timeouts
❌ Credentials exposed → Use GitHub Secrets
Best Practices for Playwright CI/CD
✅ Use npm ci
✅ Upload HTML reports
✅ Use secrets for sensitive data
✅ Keep pipeline simple
✅ Fix flaky tests early
Frequently Asked Questions
Is GitHub Actions free for Playwright testing?
Yes, GitHub Actions is free for public repositories.
Can Playwright run in headless mode in CI?
Yes, Playwright runs headless by default in CI environments.
Should I use Selenium or Playwright for CI/CD?
Playwright is faster, more reliable, and easier to configure for CI/CD compared to Selenium.
Can I run Playwright tests on pull requests?
Yes, GitHub Actions supports pull request triggers.